Posts

Showing posts from April, 2024

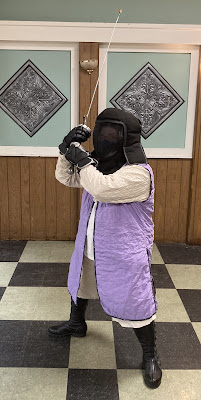
Purple/Blue Jacket - Sleeve and Lining

Image
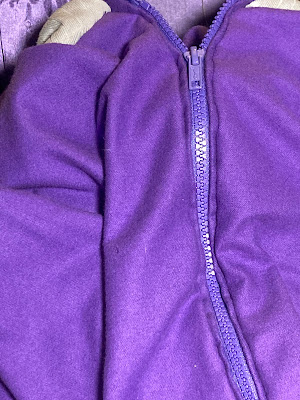
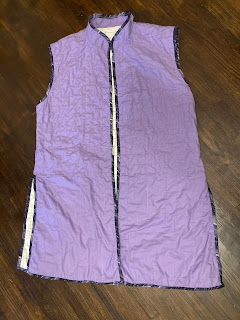
I've been working steadily on the jacket, and finally the sleeves are complete! The original pattern called for the hem between the cuffs and lining to just be pressed in place, but I wasn't pleased with how that looked. Instead, I've sealed it off with some leftover bias tape from the blue/green apron , and I definitely prefer this look. Now I need to finish the bottom (which includes elastic for the waist), and then there are some finishing stitches for structural and cosmetic reasons.  

Longsword Outfit - Quilted Jacket and Vest, Tunic, Shorts

Image
Here's my full (for now) outfit for longsword practice. The sword is borrowed, the gloves, helmet/hood, and boots are mine, and everything in lavender and white is something I hand-sewed. S9593 - Quilted short jacket (undyed muslin with quilted sleeves, closes with corset-style lacing), pattern  S9593 - Quilted vest (lavender cotton with undyed muslin lining, dark purple cotton bias tape to finish the edges) B6752 - Tunic (white monkscloth, sleeveless) Shorts (undyed muslin, cloth drawstring) I might eventually add a way to hold the long vest closed, but I'm wearing it out and about to get a feel for what options would suit me best. For now, it stays closed well enough without anything added.     

Purple/Blue Jacket - Piping and Zipper

Image
I installed the zipper (including the barely visible piping which strengthens the area around the zipper). Next, I've pinned a contrasting piping (blue) to the armholes. This will eventually create a bright blue line around the shoulder, where the sleeves meet the rest of the jacket. I love how adding the zipper turned this into a jacket, suddenly, in a way that the collar and pockets did not.

Purple/Blue Jacket - Pockets

Image
It turns out that the first thing to sew in this jacket is the pockets, so I'm working on those. They have a facing and a lining, and then get attached to the outside layer of the jacket.

Fabric Cutting Day - Blue Ombre Jacket

Image
Yesterday I cut a bunch of fabric, for a jacket which will have a purple flannel outside and use this blue/green fabric for the lining. I've also obtained a grey, ribbed fabric for the cuffs and collar, but I haven't cut any of that yet. 

Quilted Vest - Collar

Image
I've attached the collar, which was the final piece of the base garment which was necessary in order to finalize its structural integrity. Now, I need to pick a closure method for the front. The pattern recommends strings secured at the base with leather, but I intend to sweat on this too much to want to have leather elements which require different/special care regimens from the rest of the garment (which is, thus far, 100% cotton). That effort isn't worth it for 8-10 small pieces of leather when I can easily do something else. I'll likely let this one sit for a new days while I decide what to do for the final steps.

Quilted Vest - Done with Bias Tape

Image
I have finished adding bias tape to all parts of the hem, the last bit was the horizontal lower hem, and that's done now. This is a partial photo because I want to save the full thing until I do the last step. I only have one cloth piece left to attach, but it involves at least two rounds of ironing, so it'll have to wait another day. Then I need to decide once and for all which fastening method I'll use, and attach whatever is necessary. The pattern recommends a combination of leather and cording, but I have a few ideas I'm considering instead. I have dexterity issues, so I want a closure method that is as low-frustration as possible for me. I love this vest, I love how it feels and how it sits on my body. I'm so excited to get to wear it once the final bits are in place.

Blue/Green Apron - Complete

Image
I finished the blue/green apron! I was waiting on the care tags to arrive before I finished the last couple of feet of bias tape hem. The multicolored fabric is "Whale Song - Blue Ombre", and it's just gorgeous. The plain fabric is a dark blue, all the fabric and thread are 100% cotton (the only non-cotton elements are the labels, which are not pictured). The cat testing the apron's softness is Folio, she seems to approve of it.  Made with Simplicity pattern S9312.

Quilted Vest - Even More Bias Tape

Image
This particular method of affixing bias tape involves sewing each length twice: once "in the ditch" to invisibly secure the bias tape on the outside, and once via slipstitching to ensure the stitching is only visible on the underside. I've finished the first part for all of the vertical lengths, and have only one more section which needs the second part. Then I'll add the bias tape to the (horizontal) bottom hem, before moving on to add the collar and associated bias tape finish. 

Quilted Vest Bias Tape

Image
I figured out that taking the bias tape around sharp corners at the bottom edge without cutting it would just get bulky and awkward, so I'm putting in the vertical lengths of bias tape to edge the hem, then I'll figure out whether to put in the horizontal sections on the bottom edge before or after doing the second round of stitching to finish the vertical bits. I have a few more hours of sewing before I'll have to choose, since I still have a few feet to stitch before the decision point.

Blue/Green Apron - Second Pocket and Bias Tape

Image
I added the second pocket and got more of the bias tape hem sewn in place. There are a couple of feet still to sew, but I'm holding off because I'm waiting for the labels and care tags to arrive. Those will need to be attached before I can finish it up. The care tag will be placed under the edge of the bias tape on the back of the apron. 

Blue/Green Apron - Hem and First Pocket

Image
I worked on another section of the hem, then attached one of the two pockets. I used blue/white thread on the pocket so that it wouldn't be as harsh of a division between the dark blue pocket and the much livelier apron material. I'll need to focus much more on the hem, and not worry about the second pocket until later, because the hem is currently full of pins.

Quilted Vest Progress - Bias Tape Detour and More Quilting

Image
Today I got some more quilting done on the vest, I finished one of the front panels and almost completed the other one. I'm missing some of the vertical stitching towards the top/neck area, but I'll be able to finish that pretty quickly when I next sew. The thing that occupied most of my time was a detour to make custom bias tape for when I eventually complete this vest and need double-fold bias tape to finish the edges. Because it's quilted from three layers of fabric, if the edges were folded over for a standard hem the fabric would be too thick and it would lose too much fabric to the hem. Instead, putting bias tape over the edges keeps it relatively thin while still keeping the edges from raveling. Once I created it, I wound the bias tape onto a spool to keep things organized (and preserve the folds until I can use it). The tape is temporarily on a spool which still has thread on it, but I'm planning to use most of it so that's not a big deal. When I can I'l

Quilted Vest Progress - Vertical Quilting

Image
I love how it's turning out, this is the underside, with the remaining quilting lines marked. After double-checking the pattern directions it appears that I won't have enough hand-made double bias tape left over from the blue/green apron to use on the long vest, so I'll have to decide whether to use the polyester/cotton blend tape that I already have, or to make my own. Either way, I need to get this quilting done first, so I have some time before I need to have decided. I have around a third of the vertical quilting still to complete on this front panel, with twice as much left still to complete on the other front panel. I've genuinely enjoyed the process of hand-stitching all of these quilting lines, but hopefully I'll be able to do future quilting projects without the time pressure of wanting to wear the garment ASAP (I really want to wear this in my longsword class).

Blue/Green Apron - Bias Tape Application

Image
I finished making the bias tape and have pinned it onto the apron. I sewed a little over a foot of it in place - you can see it on the lower left where there are no pins for a short section. Because of the way this apron is designed, the hem is actually one continuous edge, such that when I attached the bias tape it ended where I began, without needing to stop and start a new section anywhere else. The bias tape is dark blue, but because the apron has much lighter blue and green tones it ends up looking almost black in this photo. In related news, I have enough bias tape left over from this project that if I'm fine having a dark blue finish on an otherwise lavender and cream design, I won't have to use commercially produced bias tape on my quilted vest. I care about that because the commercial stuff is a polyester/cotton blend, and I want the vest to be all cotton if I can. Since I'll be using it for exercise (longsword class), I want everything to be cotton because those f

Blue/Green Apron - Assembly and Bias Tape

Image
I've assembled the main four sections of the apron. The fabric is gorgeous, it's called a cotton called "Whale Song - Blue Ombre" and I'm so happy to work with it. It's blue with teal/green, and accent notes of pink/lavender and accompanying pale colors that aren't quite white. I'm using a dark blue solid cotton for the pockets (not pictured) and bias tape. It looks like making the double fold bias tape will be the most time-consuming part of this whole thing, probably taking even longer than putting it on the apron's edges once it's ready. Now that the bias tape is pinned, I'll iron it, then re-pin it to put in the second set of folds, then iron it again. After that, I'll trim it and continue with the other steps for this pattern, like preparing and attaching the pockets.

Skull Skirt - Complete

Image
The Skull Skirt is complete! It's cotton flannel with an elastic waistband, and it's for my wife! The thing that took the most time is the bottom hem because it's the widest part of the garment. This was made by measuring, but without use of a pattern. Made without a pattern.

Skull Skirt Progress - Waistband

Image
I'm almost done sewing the waistband, all the pieces of the skirt are attached, I just need to finish up the waistband casing (leaving a small opening), insert and close the elastic waistband, then seal up the waistband casing. The tricky part of sewing the waistband like this is that I'm placing each stitch carefully so that on the outside the stitches will be barely visible, covered by the edge of casing where it meets the rest of the skirt. After that, the final step is sewing the bottom hem.  

Skull Skirt Progress - Seams

Image
Recently I made a skirt for my wife and it went so well that I'm making another one! This one is made from flannel, with skulls on it. They have a slight hint of red and some very good shading which keeps the image from feeling flat. Yesterday I cut the fabric, and today I pinned the seams together. My goal is to get some sewing done tonight, either on this or on the apron where I also have the fabric cut and ready. I need a bit of a break from quilting, since the quilted vest will take a while yet, and I have been stitching grids for a week.

Blue/Green Apron Progress

Image
I'm working with some truly gorgeous fabric to make an apron for one of my cousins, and it looks like afterwards I'll have enough left to make something else from the remnant. The solid blue (used for the pockets and trim) is left over from the blue/yellow corset vest I made for a friend. Since I don't have enough of any of those fabrics to be the main part of a piece, I'll use up the extra in little ways like this.    

Quilted Vest Progress - Back Panel Finished

Image
I have finished quilting the back panel of the quilted vest to accompany the jacket, the thread changes color on a gradient between white and brown, passing through orange and gold. Now it's time to finish quilting the two front panels, which hopefully I'll have done by the end of next week, then I'll assemble the whole thing, which shouldn't take very long by comparison.  

Designing Clothing with Aphantasia

Image
I have aphantasia, which means I don't form mental images. I also have alexithymia, part of which means I can't imagine. So... how does it work for me to design clothing without being able to imagine or form mental images of things I haven't already seen? Patterns. Patterns are great, patterns are my friend. They teach me new techniques and new ways of putting things together. Most of the time I use the whole pattern, but sometimes the only way to get the garment I want is to heavily modify a pattern or smush features from two different patterns together. I have a sewing mood board  where I stick images of fabrics and designs next to each other until it feels right. Then, when it's time to actually make the garment, it's fine if I did the planning and design months ago, because I already put any relevant notes on the mood board or a text document I keep for designs which aren't fully formed yet.  Because I'm hand-sewing, and even small lines of stitching tak